Envelope book tutorial (sort of!)

The idea of making an envelope book came up after finding a nice letter writing set at our local car boot sale. I truly cannot remember on which blog I saw an envelope book for the first time. It wasn’t long ago, and I have been looking over the internet for a good couple of days, but couldn’t find it again. Anyway, I decided to gather a few tutorials from different places, but ended up making my own version based on what I had available.
My starting point was of course the letter writing set, which included envelopes and correspondence cards all in light salmon/coral. 
I decided to go for a green/salmon colour combination and rummaged through my stash for some matching patterned paper, washi tape and fabric.
There was some trial and error along the way, and had to repeat some steps a few times before I was happy with the results. So hopefully, this tutorial will help you avoid those mistakes and save on time and supplies.
//This is what you need//
**tools**
  • Scissors
  • Fabric glue
  • Double sided tape – 50mm for big surfaces, 12mm for smaller areas.
  • Rotary cutter
  • Cutting mat
  • Ruler

**supplies**
  • 10 A6 envelopes
  • 5 A6 correspondence cards
  • 5 A6 patterned paper
  • 13mm Washi tape
  • 2 pieces of patterned fabric – approx. 175×130 mm each
  • 1 piece of matching fabric – 70x152mm
  • 2 A6 sheets of cardboard
  • 2 A6 (or slightly smaller) sheets of cardstock
  • 2 pieces of satin ribbon – approx. 15cm each
I hope that the pictures will help clarify the instructions below.
//This is what you do//
To put together the inner pages::

1. Bind all the envelopes together using washi tape and trimming the excess. I positioned the envelopes so that on each spread I would end up with one back and one front side. 
 

2. Cover the spine of the envelope book with more washi tape, to keep everything in place. 


3. Add some matching washi tape to each of the plain correspondence cards. I put some on both sides and then trimmed the excess. 

4. Fill each envelope with correspondence cards and patterned paper, alternatively. 

 
To create front and back covers::
5. Glue the cardstock on the inner side of your chosen cover fabric, making sure it is roughly centred (I used one big piece of fabric, glued the two cardstocks and then cut it in half later using a rotary cutter).

6. Cut the four corners Fold the corners (I learned this when it was already too late!), then fold the edges and glue them onto the cardstock (you can use double sided tape if it is easier). 

7. Place one piece of satin ribbon on the long inner side of the cover, roughly in the centre (about 2cm in). You can use some double sided tape to keep it in place.


8. Lay the inner side of your cardboard sheet with double sided tape (I used the 50mm one) and gently place it on the inner side of the cover making sure it is somewhat centred. Now press. 
9. Repeat steps 5-8 to make the other cover.
To put things together::

     10. Attach the front cover to the first envelope using some washi tape (the same way you attached each envelope to one another). Repeat the same process to attach the back cover. 

11. Measure the width and height of the spine. Cut a piece of fabric as shown in the picture below. This will need to cover the central spine and some of the front and back covers. For example, mine is approximately 1.5cm(back)+1.2cm(spine)+1.5cm(front). Remember to cut it a bit longer than the height of the book and a bit wider than the spine plus the front and back. I added about 1.2cm all around, which is the same width of my small double sided tape roll. 
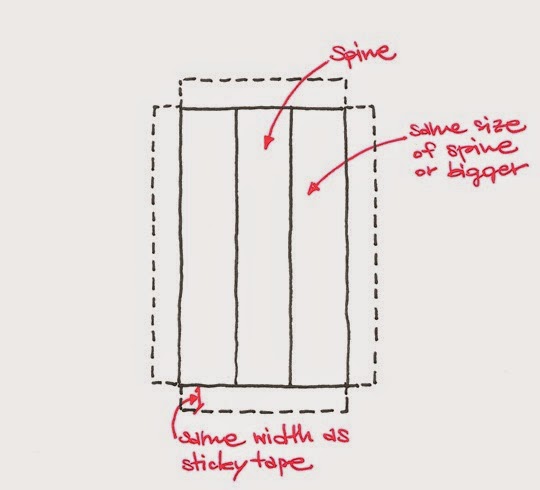
12. Lay the sticky tape on the extra fabric and fold it onto the inner side. Now the edges are secured and won’t fray. 


      13. Cover the back of your fabric, edge to edge, with the wider double sided tape.
 

14. Adhere to the edges of the covers. I used bulldog clips to keep the covers and inner pages together while attaching the spine cover. 

And you are done!


Of course there may be better and easier ways to do this, but this is what worked for me.
I am planning on using my envelope book for collecting ephemera and writing quotes. But there are so many uses to it; storing photos, receipts, thoughts, and so on.

 
NOTE: As I ended up making two extra envelope books, these are now for sale in my Etsy shop.