Sketching in Colour

I’m excited to announce that “Sketching In Colour” is live (again!)!
I have been thinking about having a dedicated blog for my artistic attempts for a while now. My blogging adventure began about 4 years ago, 1st February 2009 to be precise, with “Sketching In Colour“, a place where I could record and share with family and friends all my sketches and drawings. I was attending a number of evening classes back then and the amount of sketchbooks I was consuming was enormous.
Then during March 2010, I decided to share my interests in crafts and created “Crafting In Colour”, where I started to write about all my various craft projects.
Things started to get a bit too complicated, looking after two blogs was a bit too much at that time, so in summer 2010 I merged the two and “Creating In Colour” was born. I loved it from the start! I could write about everything I wanted in there, no restrictions.
And yet, recently I started to miss a place specifically dedicated to my sketches. It felt like my ‘art’ got lost in all the other stuff I started to write about, the projects, the challenges, the photos. My drawings do not really stand out in my blog, and so the urge to re-instate my old “Sketching In Colour” started to grow. 
Because patience is not my virtue, one evening (about a month ago) I copied all the relevant posts that I have been publishing here and pasted them in “Sketching In Colour“; job done, the blog was live again!

Since then I have been planning a blog re-do and a proper re-launch. So, here we are. I’m still planning to make some changes to the blog, like adding tab bars and moving things around; but the main layout has been set, and that’s good enough for me, for now.

I still haven’t decided if I’m going to publish double posts, or hosting a monthly sum-up of “Sketching In Colour” here on this blog; we’ll see what work best.
In the meantime, pop over to “Sketching In Colour” and let me know what you think!

Improving my handwriting

Handwriting: the way a person writes

When I was little, probably around 10 years old, I was obsessed with handwriting. I remember filling pages over pages during the summer break, practicing the alphabet. If I look back at my school notebooks, sometimes I can’t recognise my own handwriting…..I had so many different styles, and I would change it at the start of each school year. Even my signature has changed considerably over the years. I remember once, the clerk at the bank ask me to ‘copy’ one of my old signatures, because the way I was signing now was different from the way I had signed only few months back. My handwriting kept changing over the years, and despite the obsession, I couldn’t find a nice set of letters to stick to that would satisfy me entirely.
I stopped caring about my handwriting up until last year, before I started writing down my daughter’s record book. I wanted it to be perfectly written, so I started practising a bit again!
First thing I did, was to have a look at other people’s handwriting. I always admire people who can write neatly and elegantly even if they are compiling a shopping list. One of these person is my mum; she was a primary school teacher so she had a lot of practice! 
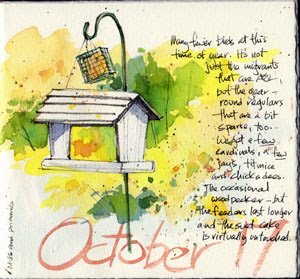
I also love people who can complement their drawings with nice handwritten notes. Love Cathy Johnson sketches and the way she collects info and thoughts about the subject. 
And what about the botanical sketchbooks of Mary Ann Scott…it’s my dream to create one of those! 
Or Kal Bartesky writing art 
And while browsing to find some inspiration I came across Austin Kleon’s blog and his article on how to improve your handwriting
What a relief knowing that I’m not the only one obsessed with handwriting.
So pen in hand I started practicing….
And practicing…
I tried different pens, different papers, different ways of holding a pen and different ways of holding the paper (try writing on a vertical board using your arm and shoulder rather than your fingers or wrist, you’ll be amazed at how the strokes can become smoother)…
And I began writing down the alphabet again…

The picture above was my first attempt to make my own font using this online tool…it was kinda cool to have a preview of how my own handwriting would look like in the digital world.

I’m still not 100% happy with my writing, but it’s getting better and, most of all, I’m enjoying the overall process. It brings back some happy memories and it helps me to release the tension.

I’m always on the lookout for pretty handwriting and thinking of taking a calligraphy course and maybe this BRUSH SCRIPT workshop.

Note: All the pictures above were taken with my phone, with the exclusion of those linked to the web.

Hand Painted Door Knobs

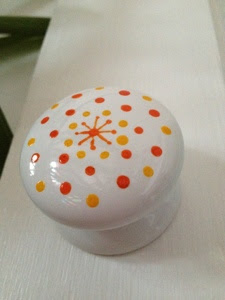
When we renovated our flat a couple of years ago, we decided to keep the original doors throughout. We stripped them out to bare wood and repainted them white. Then we went shopping for some coloured door knobs, but we couldn’t find anything we liked. Mostly the ones we fancied were designed for cabinets, and not really suited for our doors. I did some searches online and came across some beautifully hand painted knobs by Sweet Mix Creation on Etsy. I really fell in love with all the colours and the simple designs. And I thought, why not, I can do this and so I did. We found some basic (meaning cheap!) white ceramic knob handles in our local diy store, they had to be slightly modified to fit our doors and that’s where my dad came in handy…he did a marvelous job!  
These are all the materials I used:
  • White ceramic knob handles, like these ones;
  • Ceramic Paint – I used the Marabu Ceramica Porcelain and Ceramic Paint in 15ml pots;
  • Round Nylon Brush – I used the Pro Arte Polar Brush no 4.
I did quite a number of sketches before choosing the design I wanted to go for, and this was fun too. I just used some felt tip coloured pens on sketching paper.
Once I made up my mind, I tranferred the design on the knob surface using an HB pencil. This was a bit tricky because the surface was curved and my hand had nothing to rest on.
Then the fun part begun. I used the paint stright from the pot, and literally dropped it onto the surface to make dots. If you attempting this, just a little bit of advice…don’t use too much paint otherwise the drop will start dripping on the side of the knob as the surface is not flat and you’ll end up with a paint drop rather than a dot…I know this from experience!

Then I let it dry for about 24 hours. Because I didn’t need the knobs to be waterproof, I didn’t oven-bake them.They have been serving us brilliantly so far and been added a subtle colour touch to our doors.

These are the ones I made for our living room to match the orange theme of the room. And the blue/turquoise ones are for our bathroom door. There are still two sets to do, a purple one for our bedroom and a green one for our kitchen. They are on my to-do list!

30 drawings in 30 days – Last set

#21/30 – Parco archeologico Scolacium, Roccelletta di Borgia, Italy

#22/30 – Pen & Wash exercise, from Cathy Johnson Art Tips  

#23/30 – Golfo di Squillace, Italy

#24/30 – Anthurium

#25/30 – Hosta

#26/30 – Torre Cavallara, Catanzaro Lido, Italy
#27/30 – Sedia di vimini, Catanzaro Lido, Italy

#28/30 – Athelstan Recreation Ground, Kingston upon Thames, UK

#29/30 – Summer Trees

#30/30 – Il porto, Catanzaro Lido, Italy

The last 10 drawings have been a completely different story. Say that the motivation begun to fade away, say that we came back home, say that I went back to work, say that the last 10% of a project takes 90% of the time to complete…I finished the last drawing this month! Shame, I know. I managed to do drawing #29 at the end of October, but really lost any motivation to do drawing #30 until the new year. But I finally did it and along with a new scanner I was able to put an end to this torture (this is what does to me any unfinished project!). Overall I’m glad I did it, even if it took more than 30 days. I will do something similar again, but maybe joining some group projects this time to keep things more interesting.
You can find the previous two sets of drawings here and here.

30 drawings in 30 days – Part 2

#11/30 – La Capanna – Roccelletta di Borgia, Italy

#12/30 – Spiaggia – Roccelletta di Borgia, Italy

#13-14-15/30 – Doodles

#16/30 – La Terrazza – Catanzaro Lido, Italy

#17/30 – Living Room – Catanzaro Lido, Italy

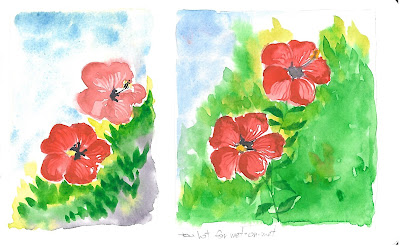
#18/30 – Hibiscus – Catanzaro Lido, Italy
#19/30 – Wet-on-wet excercise

#20/30 – Golfo di Squillace, afternoon mist – Catanzaro Lido, Italy

I was hoping to get a new scanner soon, after my old one broke down a long while ago. But since that hasn’t happen yet, I got my drawing scanned at work. Here is my second set of drawings which were done back in August. I loved the challenge of finding the time everyday to do a little sketch. I must confess we were on holiday back then visiting my parents, and it was not much of a time issue, more like getting the inspiration going…trying to fight the apathy that comes with doing (almost!) nothing all day and a 40degC average temperature! But I stuck to it and I’m glad I did.
These were mostly on the spot sketches, with the exception of #18 which was done from a photo I took in my granddad’s garden and #19 which was an example exercise from one of Cathy Johnsson mini classes. And the doodles of course are pure imagination…